March 23rd, 2008 · by Cyndi · 2 Comments
Let’s see…it’s raw, it’s lowcarb, it’s lowfat, it’s high in protein, it’s filled with healthy stuff, it’s dairy & egg-free, it’s gluten-free, it’s legume-free…what’s not to love? Oh yeah, and it is astoundingly delicious and not hard to make either.
The basic recipe is for Mexican Ceviche at http://www.recipezaar.com/8899. There are as many ways to make ceviche as there are fish in the sea, but I like the classic Mexican. Being kosher at home, I stick with fin fish, though shellfish works very well in the dish.
Costco has amazingly good (and very fresh) wild halibut at a reasonable price (be sure to get the fillets). Halibut season starts about a week into March, so it was just in time for this potluck. You can use any firm white fish (or anything really) you like, just be sure it’s good quality with no off smells.
Start the recipe at least one day before you plan to serve it. The finished dish will keep in the fridge for several days.
Fish Recipe:
2 lbs halibut fillets or other fish/shellfish
4-6 large limes (buy a couple extra just in case)
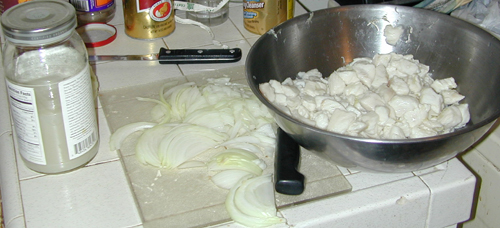
Cut raw fish into cubes about 1/2″ wide (don’t worry about being exact, but aim for semi-uniform pieces). Put in large bowl (glass or ceramic is best).
Squeeze fresh lime juice over fish (or into bowl first if there are seeds to remove) until the fish is covered. I like to include the pulp. Try to avoid limes that are large and juicy because they are overly watery.
Put bowl into fridge overnight, stirring every few hours or when you remember.
Ceviche Recipe:
2 cups diced fresh tomatoes
2 green bell peppers, chopped
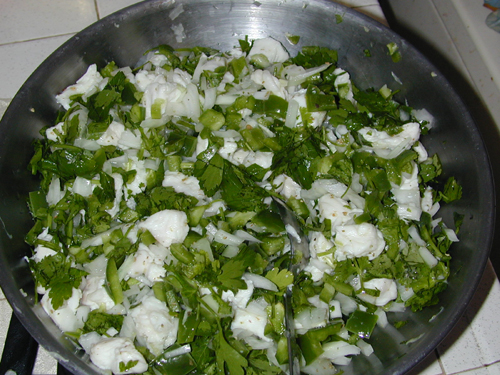
2/3 to 1 cup finely chopped herbs, a mixture of parsley and cilantro, with a sprig of oregano (the first two must be fresh but you can sub dried oregano)
1/2 teaspoon salt
1/2 teaspoon pepper
4 jalapeno peppers, finely chopped (this will be mildly spicy)
4 oz (8 TB) white or rice vinegar
1 large onion, finely chopped (optional)
1-2 dashes hot sauce
Remove fish from fridge, drain (not all the way) and save juice.
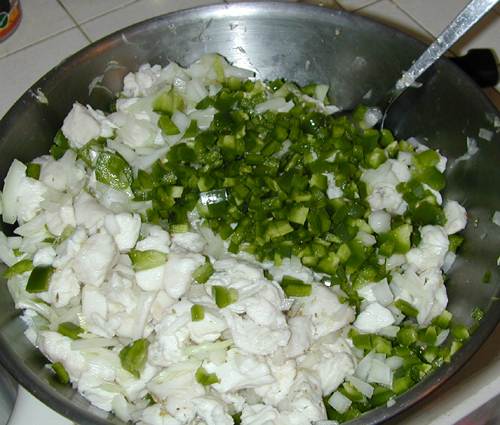
Add the rest of the ingredients, stir, and return to fridge for several hours.
Drain excess liquid before serving, mix with the saved lime/fish juice, and put into a cocktail or just drink it. Specific ideas welcome…I’m guessing vodka would be nice.
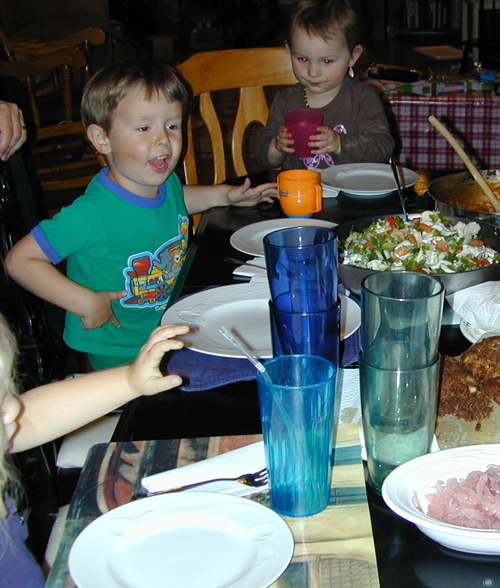
Serve in a large bowl, or on tortillas.

I’ve made this a few times now. The pictures are from the most recent time, the Los Angeles Foodlab gathering, and, I have to say, it never really came together. It was good, but never felt like a cohesive dish. Not even after sitting in the fridge for a couple of days. Let me try to deconstruct the differences.
I added onion this time; I usually don’t use it. It was definitely a mistake to use yellow: red would have been better. I added back the lime juice I’d drained from the fish (in top picture) because the fish pieces were too big (the hazards of traveling without my own knives; this also led to the herbs being too coarse) and not fully “cooked.” But it meant I never drained the liquid later either, which I should have. Also, it wasn’t quite tomato season yet so some of them were under-ripe. You need the acid juice to help the dish meld. I also left out the hot sauce and pepper because of worries over allergies of the potluck guests.
Everyone loved the dish, but I know how good it could have been. Next time I will be more faithful to the recipe.
Update June 2008:
I made a new batch and it turned out amazing.
2 lbs fresh halibut marinated overnight in lime juice, then drain
Mixed with 1 cup fresh diced tomato
2 cups sweet peppers (yellow, red, orange)
Fresh oregano
Small dollop of Dave’s Insanity Sauce
Tiny bit of parsley (would have liked cilantro and more parsley)
1/2 red onion, diced
Salt, pepper, & vinegar

Categories: Food · Main Dishes · Recipes
Tags: · dairy-free, egg-free, gluten-free, latin food, lowcarb, photos-family, photos-food, photos-friends, raw food, seafood
March 22nd, 2008 · by Cyndi · 1 Comment
On our last night in Los Angeles, we wanted to go out and try a vegan place. I get so sick of having one thing on a menu I can eat (if that) and I was hoping for more choices. After an extensive web search, including posts to Chowhound, my host and I came to a single conclusion: vegan places don’t like Tuesdays. Our first choice, Cru, was closed, as was Elf and several others. So we settled on Flore.
Flore Vegan Cuisine
3818 W. Sunset Blvd. (at Hyperion)
Silverlake, CA 90026
323-953-0611
Tues-Fri 11am – 10pm
Sat-Sun Brunch 10am – 1pm, lunch/dinner served 1pm – 9pm
Closed Monday
Michael was sick with a post-convention cold, so Emmy and I headed to Silverlake for takeout. Parking was difficult (watch out for lightly marked resident-only streets, with strict enforcement), but we managed to find a place a block away. Flore was tiny with a handful of tables. The place was full, but that meant only around a dozen customers. They have an outdoor table but it was empty.
The menu is posted near the door but there is nothing up by the register, where you order if you’re not at a table. It took several tries to get a menu. Several minutes later, I asked for a second menu, saying it was hard for both of us to look at that tiny type together. At first the two young men said they only had one menu. Then, after realizing what I meant, said–with the slightest curl of the lips–they thought I wanted large type. Chowhound and Yelp folks mentioned the attitude in reviews: we were a good 20 years older than anyone else there, customer or staff. And they seemed the type to make sure we knew it.
The good news is that, not only is everything on the menu 100% vegan, but they mark what is gluten-free too. The only gluten in the item I wanted was the bread, so I asked for lettuce instead. I was offered spelt bread. One of the workers rolled her eyes as I calmly told the cashier that spelt was a type of wheat and had lots of gluten in it. The cook said lettuce was no problem.
There were three sides options (or you could pay an extra $1.50 to upgrade to a deli case item): green salad (1 cup of lettuce, shredded carrot, cucumber, and sprouts with a small container of dressing), fruit salad (1 pint of honeydew, pineapple, and 2 little slices of kiwi), or potato salad.
After ordering, the waiter said it would be 15-20 mins. I was surprised. There was no line for tables and we were the only people ordering takeout. There were at least 4 staff people present and working. Does it really take 20 mins to make a couple of sandwiches? Fortunately, the order only took about 10 mins.
The bottom line is this is lunch food at dinner prices. My Tempeh Tu-No Melt was very good, with a creamy cashew cheese, and an expert lettuce wrap, but it wasn’t worth $9. Not even with a side of fruit salad. Michael’s B.L.T.A. was good too but similar to what we might make at home, with fried tempeh bacon, lettuce, and tomato, on six-grain bread. With a side salad and tahini dressing for $9. Emmy had The Wrap with a side salad and italian dressing for $10. Tofu, vegetables, rice, and dressing in a wheat tortilla.
The amount of food was fine for lunch but we would have needed to split an extra dish for dinner. The food was fresh and tasted good, but nothing was spectacular. If I were walking distance, I’d ignore the prices and gladly go again, but it wasn’t worth driving to.
Categories: Food · Restaurant Reviews
Tags: · dairy-free, egg-free, gluten-free, los angeles, lowcarb, vegan, vegetarian
March 10th, 2008 · by Cyndi · 1 Comment
Miriam has been planning her birthday party all year. When we would ask what she wanted, all she would say was: “Carrot cake and all my friends to be there!” That would be the same carrot cake we had last year, for her 2nd birthday party. Fortunately, she loves it.
When you’re dealing with food allergies, it can be hard to come up with traditional foods without making them seem like substitutes. Miriam’s allergic to gluten (wheat), eggs, oranges, and chocolate. And we eat very little dairy and little to no artificial stuff. Oh and low sugar, but that one goes out the window with a birthday.
But this cake is amazing. It has soy and nuts, so doesn’t work for all food allergic people, but it does avoid what we can’t have. It’s so good that people with no dietary restrictions love it. A week before the party, a friend told me her husband asked if we were going to have “that yummy cake” we had last year.
Cake:
Many thanks to Danielle Nelson of Foodlab for turning us on to the recipe (which she doesn’t remember the author of). Below is the version we actually used, which is slightly adapted from the original.
Recipe:
1/2 cup golden raisins
1/3 cup water
3/4 cup brown rice flour
1/4 cup SWEET rice flour (white)
1 tsp baking powder
1 tsp baking soda
1 tsp cinnamon
1/2 tsp xanthan gum
1/4 tsp salt
1/3 cup sunflower (or other bland) oil
2/3 cup maple syrup
4 oz silken tofu
1.5 cups grated carrots
2/3 cup chopped, lightly toasted walnuts
Substitution notes: regular raisins can be used instead of golden; the recipe calls for orange juice to soak the raisins in, instead of water, guar gum can be used instead of xanthan gum (which has traces of corn); the recipe calls for canola oil, which we don’t use.
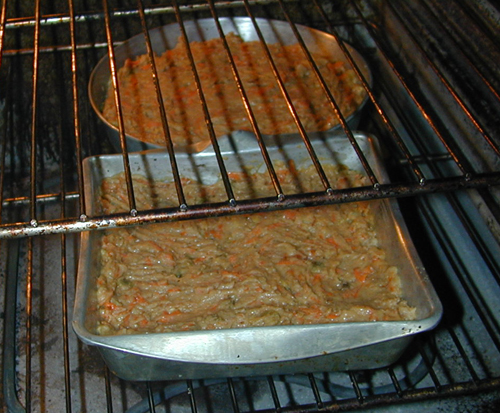
We double the recipe and use two pans.
Preheat the oven to 325*F. Lightly grease an 8″ round cake pan or equivalent.
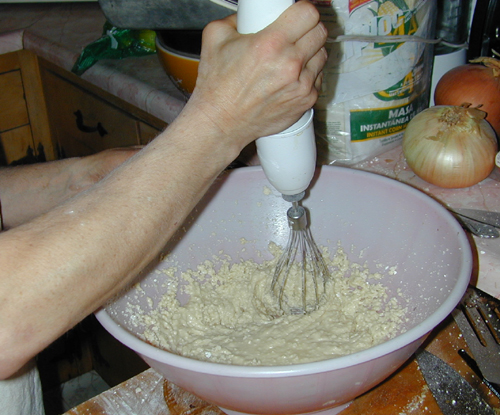
Soak raisins in water for 10 min. Drain. Mix together flours, baking powder and soda, cinnamon, gum and salt.
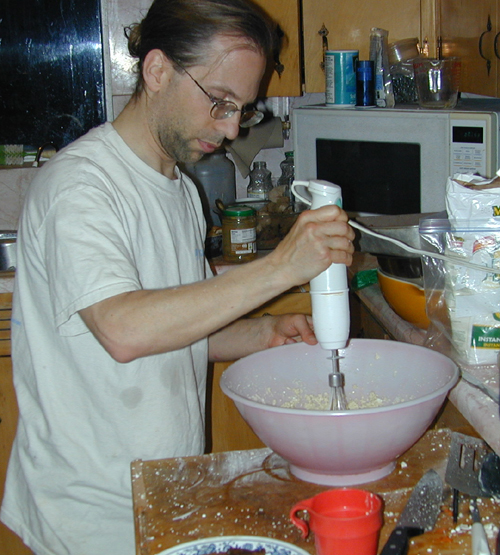
Whisk oil, maple syrup and tofu until smooth. Stir into dry ingredients. Fold in the grated carrots, nuts and raisins.
Spoon batter into prepared pan. Bake for 1 hr or until done.
Frosting:
Now for the frosting. It’s not strictly necessary but it does make it look more like a birthday cake. I am not happy with either of the frostings we made. Last year we used a standard cream cheese frosting from Joy of Cooking. The cake is already very sweet though and this just compounded it.
This year I wanted a vegan frosting so I used the recipe for Vegan Fluffy Buttercream Frosting.
INGREDIENTS
1/2 cup nonhydrogenated shortening (palm oil)
1/2 cup nonhydrogenated margarine (Earth Balance)
3 1/2 cups powdered sugar
1 1/2 teaspoons vanilla extract
1/4 cup plain soy milk or soy creamer
INSTRUCTIONS
Beat the shortening and margarine together until well combined and fluffy. Add the sugar and beat for about 3 more minutes.
Add the vanilla and soy milk, and beat for another 5 to 7 minutes until fluffy.
It was decent when first made, though not fluffy. But Michael had to make it the night before and put it in the fridge and it came out flat, even after warming to room temperature. It didn’t spread evenly and basically tasted like sweet grease (which I enjoy but Michael was not so thrilled with). Next time we’re either going to forgo the frosting or work on a different version, something vegan and not so sweet.
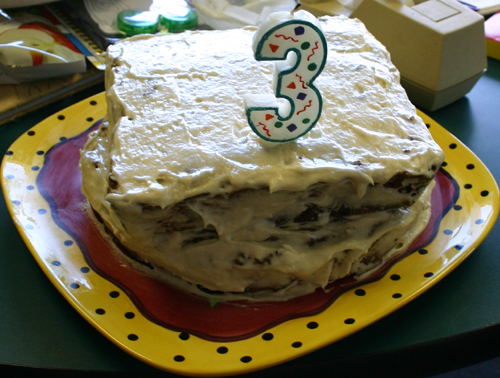
Here’s a shot of the same cake (in the same pans, though the top cake is trimmed), with cream cheese frosting and decorated with golden raisins and dried cranberries, from Miriam’s 2nd birthday party, Feb 2007.
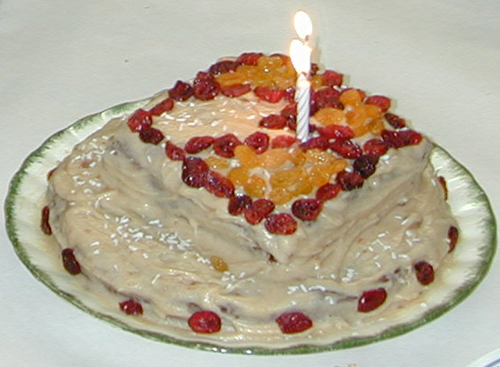
If you’re wondering why one cake is square and the other round…there is no reason, just a lack of cake pans.

Our birthday girl needed some help with the candles. Below, Michael cuts the cake, as the children wait.
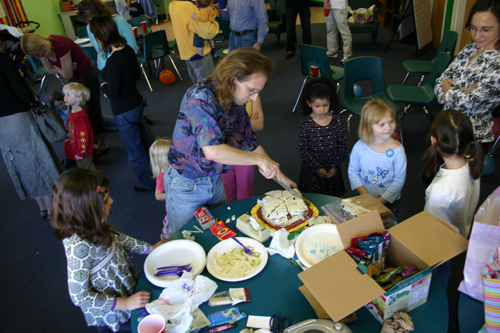
(many thanks to Yorick Phoenix for several of the photos)
Categories: Desserts · Food · Recipes
Tags: · dairy-free, egg-free, gluten-free, photos-family, photos-food, photos-friends, vegan, vegetarian
March 8th, 2008 · by Cyndi · 11 Comments
Making tortillas is one of those things that is insanely easy. Only it’s not. Once you know the tricks and have a few batches under your belt, it’s effortless. Until then, it’s an exercise in frustration. I’ve been working on this for a couple of weeks and have made it to the passable stage.
I knew I wanted to serve tacos at Miriam’s birthday party this year–it lends itself easily to accommodating any set of dietary restrictions, including Miriam’s, without being a pale substitute of the “real thing”–but my intention was to go buy some nice fresh corn tortillas. After all, I live in an area with a lot of Mexican immigrants and good Mexican food is all over the place.
I went to the biggest of the Mexican markets, Lola’s in Santa Rosa, where they sell several brands of tortillas, including their own. Imagine my shock to find that every last brand, even the storemade ones, was filled with preservatives and other nasty things. The only straightforward ingredients ones were at Trader Joe’s and Whole Foods and were both pricey and only so-so (some were pretty stiff and old looking).
So I picked up a big bag of masa flour. That’s just corn that has been treated with lime (calcium carbonate, not citrus) to make more nutrients available and then ground and dried into flour (even though they look alike, you don’t want to use cornmeal here). Maseca brand (which seems to be the big name brand) Masa Instantanea de Maiz. The 2 kilo (4.4 lb) bag makes (in theory) several hundred tortillas and cost me all of 3 dollars.
Now, I’d made tortillas before, in Nicaragua, and it was pretty easy. I didn’t mix the dough but I learned how to form the tortillas by hand (on a plastic covered plate) and put them on the griddle. So that’s how I tried it this time.
Attempt #1 (2/23/08):
I used the masa today to make tortillas. It was 1/2 cup of masa to 1/3 cup of water and a pinch of salt. Supposed to make 4 tortillas.
You mix for 2 minutes with your hands and adjust water and masa as needed to make the dough. Then divide into 4 balls, press, and cook for 50 seconds on each side on an ungreased pan/etc.
I couldn’t find my tortilla press so I decided to do it by hand. I started with a small plate, but they stuck. So I put a plastic produce bag on the plate which worked very well.
I couldn’t get them as thin and large as a press would have, though they weren’t even as thick as a Salvadorian tortilla. They fell apart some and I tried adding a bit more water but I’m not sure that was the problem.
I found they needed more than the allotted time to lose the uncooked taste, but that might have been because they were thick. There wasn’t any trouble using an ungreased pan, though mine is a well seasoned cast iron.
They tasted really good but a bit dry. I honestly thought the dough recipe would have fat in it. Because I had to cook them a bit more than suggested, they didn’t roll up well, but I could sort of use them for tacos.
They aren’t party ready I’m afraid.
Then I did some web searching and found a couple good sites with pictures. One uses a little shortening in the dough, the other does not.
It seems that:
- I do need a press.
- I need to knead the dough longer and better than I did, to help it develop (this avoids the stiffness).
- I should add a bit more water to help the tortillas steam.
http://www.elise.com/recipes/archives/004141how_to_make_corn_tortillas.php
http://www.cooking-mexican-recipes.com/corn-tortilla-recipe.html
I also was told that one of the secrets is to let the dough sit (covered) for 30 mins after kneading, but not to make it too far in advance.
Attempt #2 (2/26/08):
1/2 cup masa flour
1/3 cup water
pinch of salt
(same as last time)
This time I kneaded it well for 2 mins, covered it with a towel, and left it to sit for 30 mins (more like 40 because I got a phone call just before my timer went off.
I still can’t find my tortilla press but, looking at pictures of them, I realized that they don’t have a lip. The roundness of the tortilla is purely due to the fact that you’re applying even pressure on to a round ball of dough.
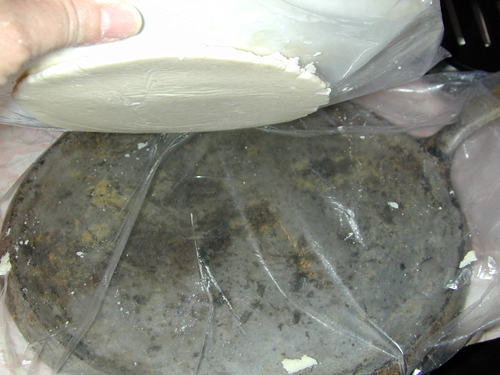
So I used a comal (not sure of the spelling) I happened to find in my cupboard (that’s a tortilla cooker, mine appears to be cast aluminum) as the base and a salad plate (Corningware) for the top. I put both into plastic bags, which was way easier than having loose pieces of plastic.
I rolled the balls of dough and pressed and ended up with a perfect round tortilla. I had to flip it around to get the thickness even and I couldn’t get it to be any bigger than about 3.5″ or so in diameter. I realized that was the diameter of the part of the plate that touches the table, so next time I’ll try a dinner plate.
The tortillas peeled off easily and cooked up well. They tasted great but the thick one (I did a double-size ball in an attempt to get a bigger tortilla and it was only somewhat wider) was a bit doughy and cracked when folded.
I think maybe I should add more water even though it will be slightly stickier because I think that will make them stay together better and steam cook, which is a point some of the sites I read stated.
With two people working at a time, and more than one pan on the stove, I think I could churn them out pretty quickly. The rolling and pressing is less than the cooking time and easy now, so if I can cook 4 tortillas at a time, I could do 100 in half an hour of nonstop work (make it an hour to include mixing the dough, set up, etc). I’m not counting the dough resting stage.
If I could only get the tortillas thinner and larger, I think they’ll be real winners.
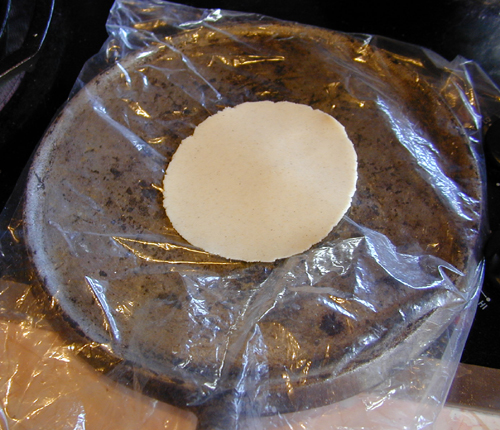
This is from attempt #2. That’s the biggest I could get them.
Attempt #3 (3/1/08 & 3/2/08):
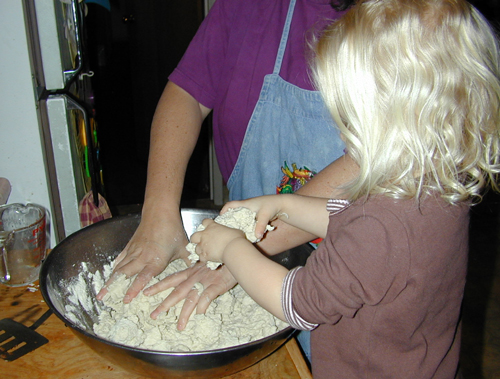
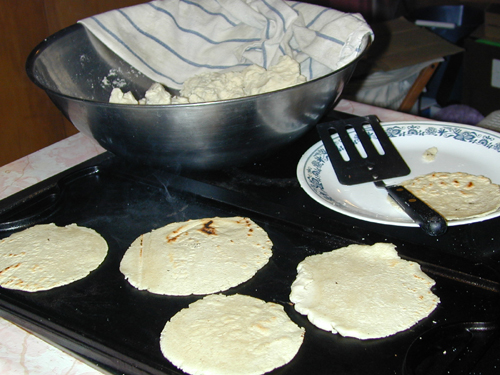
These are the ones I served at the party. I mixed up a big 8 cup (of flour) batch and added water and salt. Miriam and I kneaded it well for at least 2 minutes. Then I covered it with a damp towel and let it sit for half an hour (more like 45 mins because I got a phone call).
The pressing and cooking part took about an hour for 50 or so tortillas. Just me doing it. With a better press and more practice, I think I could cut the time in half. Another pan would have helped too.
Recipe:
8 cups masa flour
5 cups filtered water
1 tsp salt
Take some masa, roll into a golf ball size, place on the middle of the bottom of the press, and press the heck out of it. With a press you probably can just push hard, but with a plate, you have to roll it around a bit to get the tortilla even. I still didn’t achieve thin tortillas, but that was okay. They weren’t too thick and they looked more or less like the ones in the pictures of the sites above.
For the press, I used a dinner-sized Corelleware plate on the comal, both in zipper plastic bags. I loved not having to futz with loose plastic but there was a disadvantage because it was harder to get some of the softer ones off the plastic.
As I cooked up my first couple of tortillas, I played around with some of the parameters. When the dough was totally non-sticky and came off the plastic with ease, it tended to break in half, including after being cooked. If I added more water, it cooked up really well but was impossible to get off the plastic. So I came up with a brilliant idea (which I’m sure is not original, but I’ve not seen it before): make the dough more wet, form the ball, then roll it in a bowl of dry masa flour. Then press. Success! there was plenty of extra water on the inside to cook up soft but the outside was dry and peeled off easily.
I used the flat side of a cast iron griddle that lay over two burners on my electric (flat) stove. At high heat turned down a bit. No fat on the griddle. I have limited counter space so the bowl of dough went on the stove. The side of the bowl next to the griddle got pretty hot and the dough dried out easily; I had to add water a lot.
I cooked them for about a minute on one side, turned over, then 30-60 seconds on the other side, then over again for a few seconds. I know I overcooked a few but I didn’t want them to have a raw taste either. Just taste as you go along and you’ll get the rhythm of it.
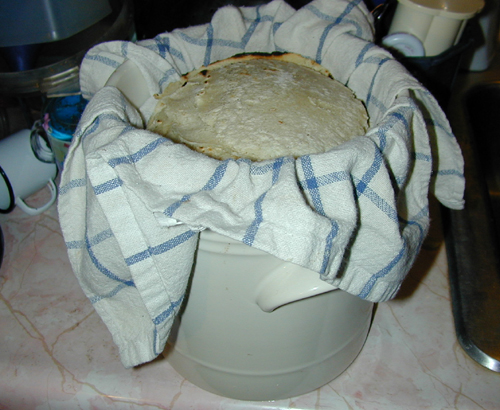
To keep them fresh, every so often, I transferred the finished tortillas from the plate on the stove to a crock lined with a clean dish towel. It’s a good thing Miriam kept eating them or I wouldn’t have been able to fit them all in.
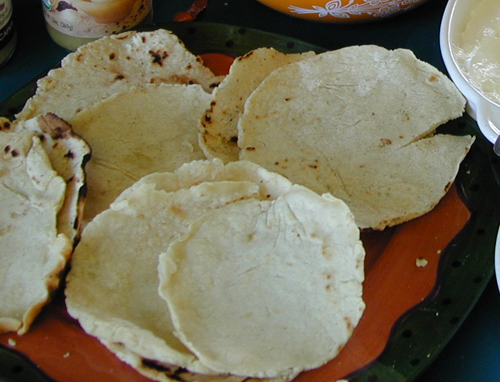
The hardest part was reheating the next day. I made a batch half the size of the one above the morning of the party, but they were cold by party time too. I still don’t have the hang of it. Obviously, these are best eaten just after cooking, but that’s not always practical. You can fry them but that isn’t what you want. We tried just putting the ceramic bakeware (not the crock, but a regular casserole dish) in the oven but only the couple tortillas on top got warm. Still, they came out nice and people enjoyed them.
Categories: Food · Grains · Recipes
Tags: · dairy-free, egg-free, gluten-free, latin food, photos-family, photos-food, vegan, vegetarian
March 7th, 2008 · by Cyndi · No Comments
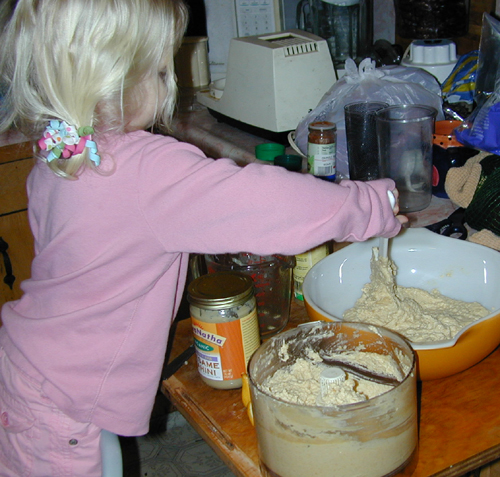
My daughter adores Lara Bars, which are raw (dehydrated) bars of a very smooth date paste mixed with finely minced nuts and various flavorings. Unfortunately, they’re not organic and they’re expensive. Even the Costco box (only 3 flavors) is still nearly a dollar a bar. Other flavors cost $1.20/bar and more.
I’ve tried my hand at making them before with varying degrees of success. The secret to the Lara texture is to food process the heck out of them (or to use a blender with some extra water)…save the nuts to add in after. I like them with a bit more texture though, and adding water just means you have to cook/uncook them longer which also changes the texture.
Tip: rough chop the dates with a big knife on the cutting board. The whole (or even half) ones will stick to the food processor blades and make it impossible to do anything.
This time I tried Miriam’s current favorite flavor, banana. The dates weren’t organic, because I found a big thing of them cheap at Costco, but I usually use organic and, now that I’ve got the recipe down, will find the good ones to mail order.
No measurements. I processed the dates in two batches. Here is batch one:
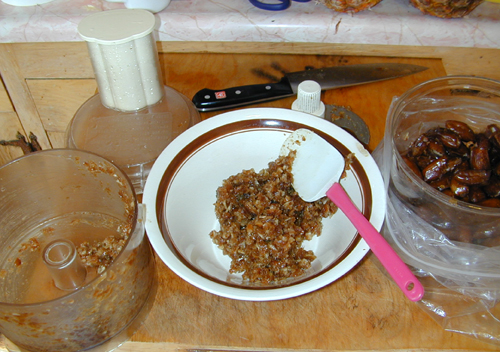
Note the chunky texture. That really made the difference in the bars. I had to add a touch of water to get them going (the amount will vary with the dates). Do be sure to go through every date with your hands before putting in the processor. I found one pit and several little end caps in the dates I used.
In batch number two, I added the banana (2 of them) and cinnamon powder. So I didn’t need to add water. This I processed smooth.
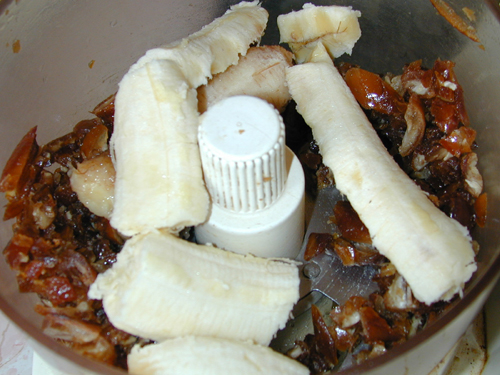
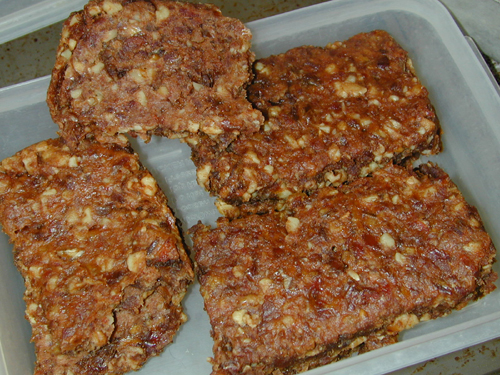
After removing them, I put in the nuts. I was going to use pecans but they weren’t good so I used the only nuts I had, which were walnuts. Process into small chunks. Then mix everything together.
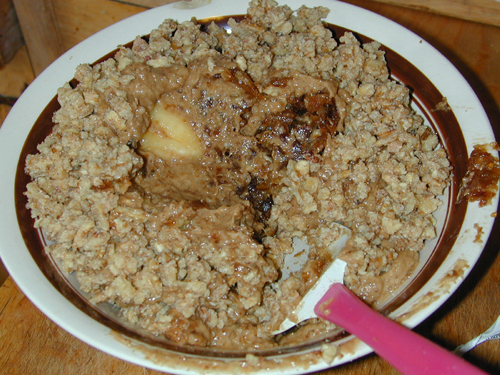
Put into a pan. This batch is thick enough that even choosing a pan that was too big didn’t hurt anything. Aim for 1/2 to 2/3″ thick. No need to grease the pan.
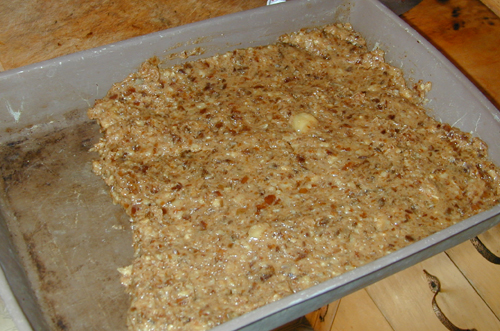
Technically, these aren’t raw, despite the tag, but they can be made raw. If I had a dehydrator, I would use it. But I don’t, so I just set the oven to the lowest setting, 150*F. They only took a couple of hours for the main drying. When you can do so easily, cut into large pieces and flip them over. After another hour or so, cut into smaller bars and prop up.
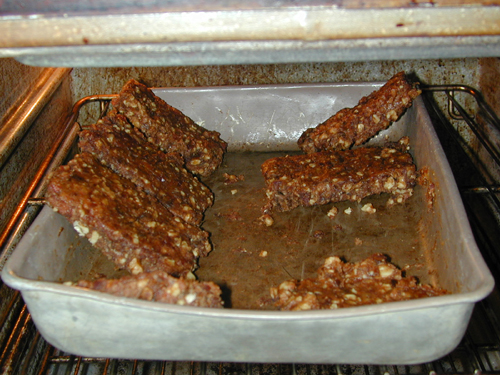
The total amount of time will depend on how much water was in your ingredients and added, the temperature of your oven or dehydrator, air flow, your pan, and various other factors. I was cooking other things so just left the oven on for a while through-out the day, and finished them off the next day.
What you want is something soft enough to cut and bite into easily but dry enough that it’s no longer sticky. In theory these should be safe to leave out covered at room temperature but I store them in the fridge. They are best when back at room temperature or warm from the oven.
Categories: Desserts · Food · Recipes · Snacks
Tags:
March 5th, 2008 · by Cyndi · 2 Comments
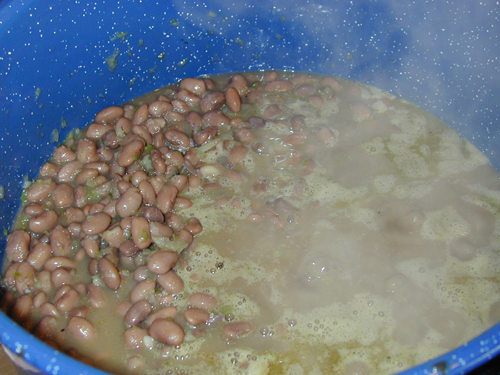
Making beans from scratch is pretty easy, so you have to wonder why everyone doesn’t do it. Canned beans are okay in a pinch, but many are overcooked and insipid (Whole Foods brand is pretty decent, even the refried ). And dried beans are much cheaper than canned. For anything large, where I have more than a couple hours notice, I always make mine myself.
I made two big pots of beans for Miriam’s birthday party.
- Plain whole black beans
- Refried pinto beans
Start off by soaking them overnight (at least 4 hours but 8 is better; up to 24 is okay). Simply measure the beans into a pot and use filtered water to cover, plus several inches. They will expand a lot. I don’t bother to wash them since I dump the soaking water. If there is a chance of a stone, dirt clod, or bum beans, dump them on a table or cookie sheet and sort by hand while still dry.
I used 3 cups of dried black beans and 4 cups of dried pinto beans.
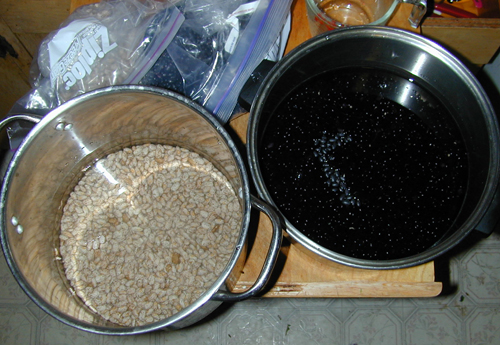
After soaking for some time (these went about 24 hours), and adding more water as needed, the beans look like this.
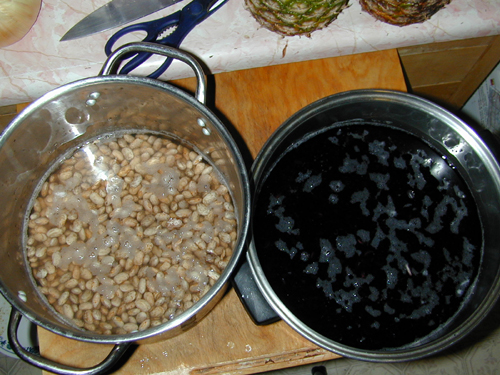
Dump each pot into a colander and discard the soaking water. Put the beans back into the pot, add more water (filtered) to cover plus an inch or so, and cook on medium heat until the beans are soft.
For plain beans, they are done at this point. I added a bit of salt to the black beans, but that was it. I used a slotted spoon to lift them into a bowl for serving.

For refried beans, you have an extra step (or two or three). I minced one very large yellow onion in the food processor (some liquefied, which was fine, but make sure some has some texture to it) and sautéed it in olive oil. I added two gutted jalapeños to the fine mince/liquefy part of the onion processing. The bite was there at first but got lost after the beans were fully cooked, so more would have been better for a non-kids party. When the onions had some color on them, I added the pot of beans, along with salt.
Cook until most of the liquid is gone. They will solidify when cool, so you can leave them slightly more watery than you think would work. At some point during the cooking, preferably after the heat has been off for a while, use a stick blender or potato masher to smash up the beans.
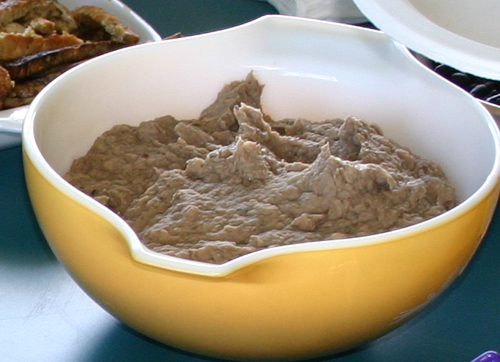
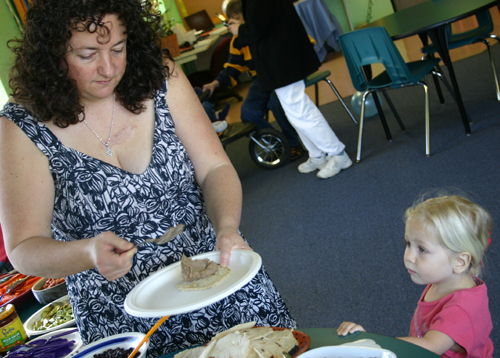
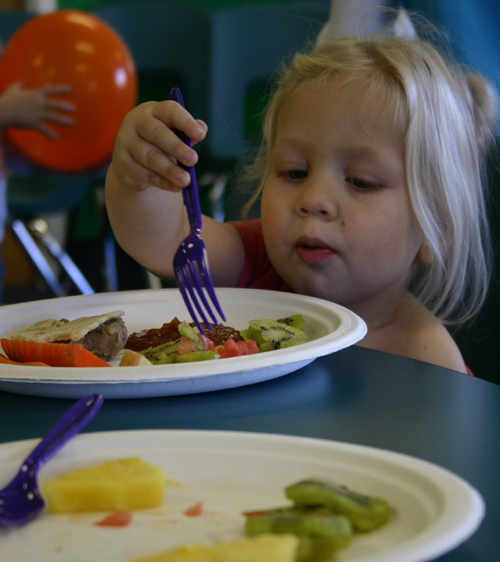
Serve warm with tortillas or anything you like.
(many thanks to Yorick Phoenix for several of the photos)
Categories: Food · Main Dishes · Recipes · Vegetable Dishes
Tags: · dairy-free, egg-free, gluten-free, latin food, photos-family, photos-food, vegan, vegetarian
March 4th, 2008 · by Cyndi · No Comments
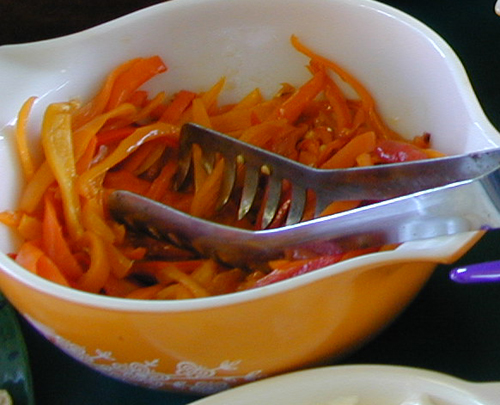
I picked up some beautiful organic sweet peppers on sale at the market and thought they would be lovely for Miriam’s birthday party lunch, as a taco filling. And they were.
These are small peppers in vibrant yellow, red, and orange. They are thinner skinned than bells and don’t have quite the same flavor, but they aren’t at all spicy.
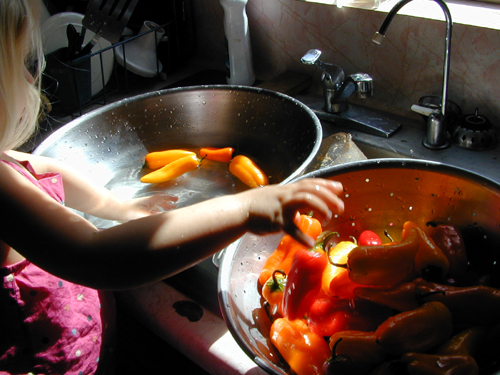
I just washed them, cut them in half lengthwise, removed the stem and seeds, and sliced into long thin strips.
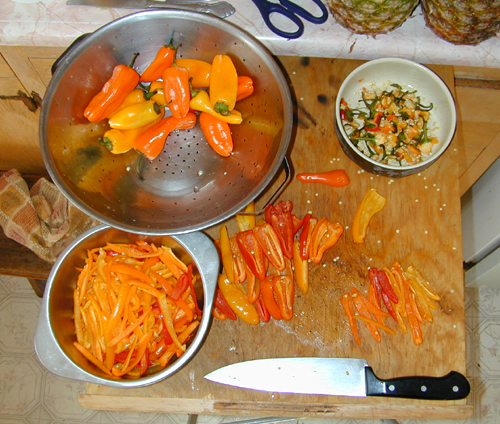
Then I put them on a baking dish with a touch of olive oil and roasted them. Because I was cooking something else at 150*F, that’s how I cooked these peppers. The ultra-low temperature turned out to be perfect, as they barely heated and didn’t have a strong cooked flavor. They didn’t burn or get mushy either. I just tossed them every so often. They took a couple of hours. Wonderful.
Categories: Food · Recipes · Vegetable Dishes
Tags: · dairy-free, egg-free, gluten-free, lowcarb, photos-family, photos-food, vegan, vegetarian
March 3rd, 2008 · by admin · No Comments
I’ve gone through all the posts and added tags as appropriate for photos. I know many readers want to see pictures of Miriam. Those who don’t know us might come for the food photos. Now you can find them in one place. Click on the “tag cloud” on the left of the screen for the ones you want.
Photos-Family – Mostly pictures of Miriam, but also Cyndi and Michael, and our various family members, human and feline.
Photos-Food – Mostly ones we have taken, but the occasional outside one as well.
Photos-Household – Furniture, building, misc house stuff.
Photos-Misc – Everything else. Friends, places we’ve been, etc.
Categories: Website Commentary
Tags:
March 3rd, 2008 · by Cyndi · 2 Comments
So, Miriam and I are at Whole Foods shopping for supplies for her birthday party (3 years old!) and we stopped at a display with cut and wrapped pieces of watermelon, one of her favorite fruits. I asked her if she wanted some for her birthday party.
She turned to me and asked: “Is it in season?”
Oh man I love that girl. I’ve been teaching her about produce being in or out of season and have told her that we couldn’t have the things she wanted much of the time due to that (price, quality, etc). I guess it’s rubbing off.
Yes, we bought the watermelon (she had some for her actual birthday dinner too). Local, organic, and in season are all important but we make some exceptions.
Categories: Family Life · Food · Food Commentary · Miriam Updates
Tags:
February 26th, 2008 · by Cyndi · 6 Comments
I have many versions of hummus because I make it so often. This one is my basic recipe made with dried chickpeas. Other recipes use canned beans, larger amounts, different flavorings, etc. I even have one made with edamame instead of chickpeas.
Recipe:
2 cups dried chickpeas, soaked and cooked
1 1/3 cups (10-11 oz) tahini
2/3 cup (5-6 oz) lemon juice
Salt to taste
Chilpotle pepper powder to taste (I use around 1 TB)
Cumin powder to taste (I use around 2 TB)
Olive oil (I use maybe 3-4 TB) – the good stuff only
Parsley, fresh and finely minced (optional but lovely)
Note: 2 cups dried chickpeas makes the equivalent of 4 cans of chickpeas. My basic canned chickpea hummus recipe calls for 3 cans, hence the odd measurings.
First, cook the chickpeas:
- Measure 2 cups of dried chickpeas into a large container
- Cover with water plus several inches
- Leave overnight (at least 4 hours, up to 12 hours, though you can get away with 24)
- Drain out water (do not reuse) and put soaked chickpeas into a cooking pot
- Add water sufficient to cover plus 1/2″ or so more (do not add salt)
- Cook until peas are soft but not falling apart (an hour or so)

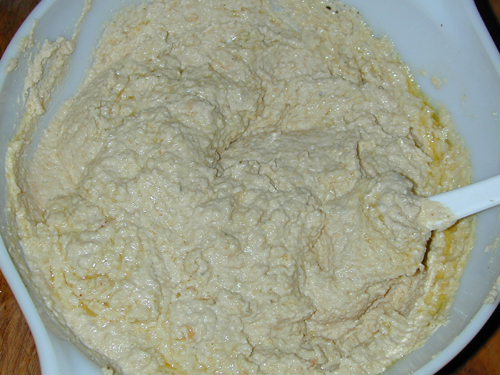
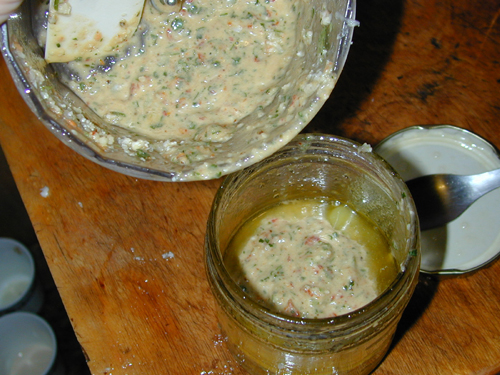
Next, use a food processor to mix all the ingredients together, except for the olive oil and parsley. I find that 3 cans of beans fits perfectly with the rest of the ingredients in my food processor. If yours is the same, process this recipe in two batches and mix together in a large bowl. Try to balance the other ingredients so it will be easier to decide on levels of seasoning. Also, if you like your hummus a bit chunky, hold back some chickpeas and liquid (but not seasoning or tahini) for the end and lightly process them before adding to the mixing bowl.
Do not use all the chickpea cooking water. Use a slotted spoon for transferring the chickpeas and only add water as needed for processing. Leftover water is great for soup stock, just freeze in a zipper bag or glass jar.
Put everything into a large bowl and stir, adjusting seasoning as needed (it may take more salt than you think).
Chill the bowl of hummus (it’s fine to serve at room temp also). Before serving, add olive oil and mix. If you’re using parsley, you can mix it in or sprinkle on top.
Categories: Food · Recipes · Spreads & Dips · Vegetable Dishes
Tags: · dairy-free, egg-free, gluten-free, photos-family, photos-food, vegan, vegetarian
February 23rd, 2008 · by Cyndi · 1 Comment
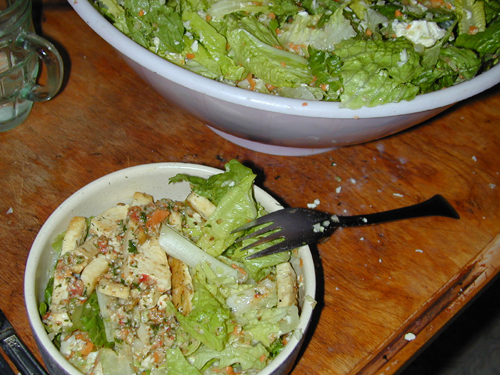
A favorite dinner of mine is a big salad with lots of finely chopped vegetables and warm protein on top. For those of us who want to eat more raw foods but feel better with something both physically warm and solid, this is a great combination.
The salad works on its own too, as a low-protein meal (or add nuts and seeds) or a side dish. I’ve made it completely without lettuce, but I usually put in some lettuce as a base.
My most handiest dandiest tool is the chopper attachment of my stick blender. Fairly easy to clean and it performs well. I just wash and trim the vegetables then cut into manageable chunks.

The chopped part of this salad was carrots, cauliflower, celery, and daikon radish. I love to add beet, but didn’t have any. Broccoli stems (not the flowers!), collard greens or chard (all or stems only), and regular radishes are all good. Try to vary the colors some.

The rest of the salad included romaine lettuce (torn by hand, though slicing into fine strips is a nice variation) and avocado (diced by hand). Use what you have. Sprouts, sunflower seeds, anything you like.
I often make the dressing in the chopper too (hold tightly while on to avoid spills). This one came out exceptionally well. I had made a quick olive oil and apple cider vinegar combo the night before (didn’t end up needing it then) and stuck it in the fridge. When I made the dressing, I spooned out some of the softening olive oil and poured the vinegar into the chopper. I mixed the chopper contents back into the dressing jar and shook.
This recipe had: fresh cilantro, sun-dried tomatoes in olive oil, mustard (Annie’s horseradish), hemp seed (can also go straight on the salad), and some salt and pepper.
You can use anything you like as a protein topper. This time I sliced very firm tofu into thin strips then fried in olive oil with salt, pepper, cumin seed, and dried dill weed.
Categories: Food · Main Dishes · Recipes · Vegetable Dishes
Tags: · dairy-free, egg-free, gluten-free, lowcarb, photos-family, photos-food, raw food, vegan, vegetarian
February 17th, 2008 · by Cyndi · 1 Comment
I don’t know who was more excited: the birthday girl or her mom. Miriam is turning 3 on February 26th and I wanted to get her something special. She’s been planning her birthday party for nearly a year now and, whenever we ask her what she wants (either for the party itself or for her birthday in general), all she says is “carrot cake and all my friends to be there.”
But one item I know she wanted is a piano. She refers to grandma’s and grandpa’s (my parents) place as “the house with the piano” and pianos are the first thing she gravitates to if one is available. She played a cheap electronic one as an infant, until it broke. I was going to set up my electric one but I can’t find it…I know exactly where it was in the garage, but I suspect it was stolen.
Every so often, someone will post to Freecycle to give away a piano. I usually write in to ask for it, but it’s one of those things that goes fast…within minutes. So when I saw a Kimball Spinet (a good solid brand in the size I wanted…small) listed right here in town, I wrote but didn’t expect anything. But I got it! We picked it up today. And it’s gorgeous.
I paid two friends to move it for me but, other than that, it was free (I thought I’d need to tune it but it seems okay, say two musicians who came to check it out). I really wanted a real piano, not an electric, but the real ones are out of my financial reach. So this is amazing.
I’ve always thought that Miriam had musical skills (as an infant she’d pick at the little electric piano with one finger of her right hand, while banging with the entire left hand and singing) and she seems pretty determined when she plays now, but of course that’s a mom’s view. But several other people have said it too and asked if there is piano in her blood. Why, yes, there is…that would be my paternal grandmother, Miriam’s great-grandma Miriam (of course).

Categories: Family Life · House & Home · Miriam Updates
Tags: · furniture, photos-family, photos-household
February 14th, 2008 · by Cyndi · 1 Comment
For dinner tonight I made a simple but elegant meal. Each item wasn’t hard to make, though having four of them took more time. The details make a difference too. Nicer plates, eating at the dining room table (something we should do every night, but don’t), using wine glasses.
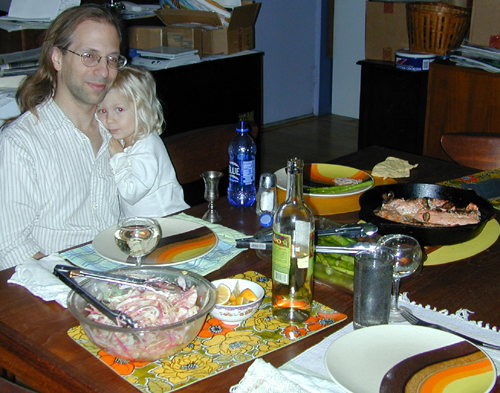
Miriam and I went to Whole Foods today and found asparagus on sale, so we got a lot of it, because it’s good leftover. Then we went to the fish section to see what they had. There was some inexpensive coho (king) salmon (previously frozen from local catches over the summer). This was an uncut half salmon, so I did what I did last time and got the fish filleted with the leftovers in a bag for fish stock.
Then we went back to the produce department to pick vegetables that went with the fish. I decided to roast the asparagus then I talked out loud to myself for a while (confusing the produce worker) before deciding to make a raw marinated salad.
This is what we had:
Baked salmon
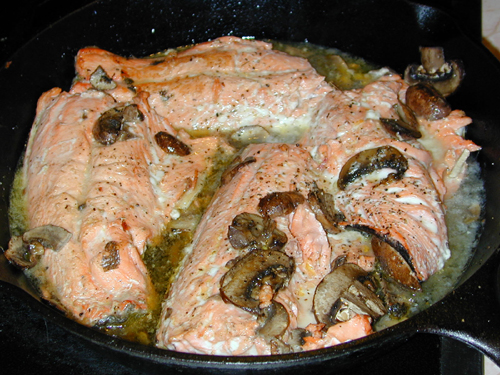
I bake salmon all the time. I love the stuff but it can get a little old to cook it the same way. So I decided to try something different. I lightly seared the fish skin side of the fillets in a cast iron skillet with some olive oil. Then I added sliced crimini mushrooms and turned the fish over to lightly sear the other side, adding more oil as needed. “Sear” implies browning but I didn’t do that; I just lightly cooked it so that it would seal in some of the moisture. Then I turned off the heat, turned the fish back skin side down, added a bit of salt and pepper, put some white wine in the pan, and stuck the whole thing in a 350*F oven. It came out absolutely amazing.
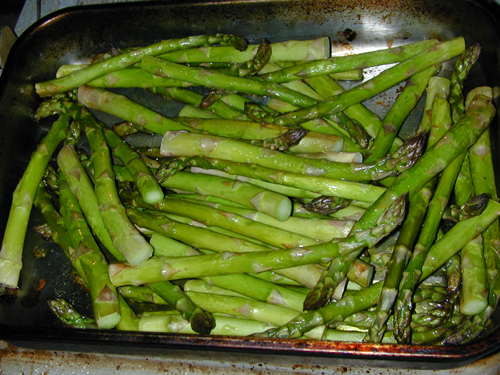
Roasted asparagus
Very simple. Rinse asparagus, remove tough parts of ends, toss in baking dish with olive oil and salt (I used coarse celtic salt), bake until done (turn every few minutes). I started off in a 350*F oven then turned it up to 400*F after the fish was out.
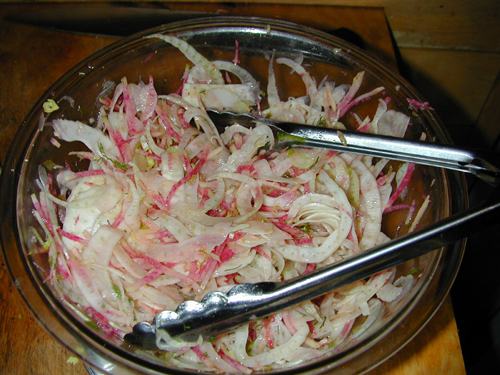
Fennel salad
Using my mandolin, I sliced a fennel bulb (saved the stalks for later), one red daikon radish (also called watermelon radish), and 1/4 jalapeno pepper (couldn’t taste it; I should have used 2-3 times as much). I added a bit of chopped fennel leaf and dressed the salad with the juice of 1 fresh lemon, olive oil, and some salt. Subtle flavors but a perfect complement to the rest of the meal.
Additional Foods
Lemon wedges, white wine, and strawberry ice cream for dessert.
As we ate this meal, I thought back to a comment a newcomer to an allergy list made today: how can I live without cheese! No disrespect intended to the poster; we’ve all been there with our additive foods and patterns. But here we are, eating this amazing meal with no dairy, no eggs, no gluten, no legumes, no grains, lowcarb and mostly all organic. Go on, ask me if I feel deprived 🙂
Categories: Family Life · Food · Food Commentary · Main Dishes · Meals & Events · Recipes · Religion & Holidays · Valentine's Day · Vegetable Dishes
Tags: · dairy-free, egg-free, gluten-free, lowcarb, photos-family, photos-food, raw food, seafood
February 14th, 2008 · by Cyndi · 1 Comment
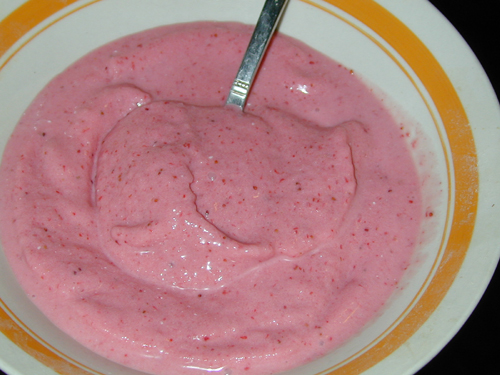
Who says you need dairy or sugar to enjoy ice cream? Though I make lots of sorbets and ice milks, this one is full cream.
Recipe
3 cups pureed strawberries
1 can coconut milk (lite works better but regular is fine)
A couple tsps vanilla extract
Squeeze of fresh lemon
Pinch salt
Stevia to taste
If you have an ice cream maker, put all of the above into a blender, blend until smooth. If you prefer chunks of fruit then put everything except for some of the strawberries into the blender, blend until smooth, then add the rest of the strawberries and pulse until it’s how you like it. Stick it all in an ice cream maker and run it per the directions for your machine.
This recipe is fabulous with fresh strawberries, but frozen is good too (you can freeze the puree with or without the flavorings; then defrost for the ice cream maker and avoid cleaning the blender…I suggest measuring the puree into well marked jars or zipper bags before freezing).
If you don’t have an ice cream maker (or if yours is broken, like mine is), you can still make this, just change the technique a bit. For the strawberries, use individually frozen ones (we make big bagfuls every summer). Put the rest of the ingredients in to the blender until very smooth. Add a few berries and blend on low until the noise dies down (note: you need a blender that can handle ice cubes) then on high until smooth. Repeat a couple times until the mixture start to thicken up.
After a while, it will be as thick as ice cream. My example below is thinner than I like it, but I was being lazy. If you use stevia instead of sugar or a similar sweetener, any leftovers will freeze very hard. Leave lots of extra time to partially defrost it before serving.
Categories: Desserts · Food · Recipes
Tags: · dairy-free, egg-free, gluten-free, lowcarb, photos-food, raw food, vegan, vegetarian
February 10th, 2008 · by Cyndi · 2 Comments
This is a follow up to Part I from Dec, 2007. We got this bed frame for free from Freecycle and it was a mess. Massive scrubbing ensued. Then we varnished, but the coat done in the late afternoon bubbled due to the cold. It took nearly two months before we had a warm sunny day, on a day that Michael had off, when neither of us was sick. That day was yesterday.
We sanded the bubbly spots, washed off the dust, and re-varnished. It came out pretty good, as you can see. A few hours of ozone this morning then we put it all together. And now Miriam has a bed. All she needs is a mattress (we have a piece of foam, but it’s too narrow, too long, and too toxic).

Categories: Building · Family Life · House & Home · Miriam Updates
Tags: · furniture, paint/varnish, photos-family, photos-household

